Monday, September 9, 2013

Malibu Barbie x Lara Croft

Hello, and welcome to my favorite outfit.  We all have our go-to outfits, even if that means a pair of jeans and a white tee, but this summer I found a favorite pairing that was a little louder than your set of basics--but just as easy to throw on and go.  A small black cap-sleeve shirt, loose palm tree print shorts, and ankle-strap sandals and I'm out the door feeling like I can still easily take over the world--


Maybe it's mixing of the ponytail and short shorts with sunglasses, a palm tree print and lots of pink but I feel like this look is where Lara Croft meets Malibu Barbie. AND WHAT COULD BE BETTER THAN THAT!??!!!


Orange lipstick is also something I dared to venture into this summer, and although VERY VERY skeptical as a redhead, I was surprised to immediately fall in love.  With this look, I think it compliments the blue hues nicely and with a simple pony & pretty basic face of makeup it adds some extra flavor to the casualness of the look.


DEETS--  Palm Tree Print Dolphin Shorts: Forever21
Django Sunglasses: ZeroUV
Pointed Toe Sandals: Zara
Lipstick: Maybelline ColorSensational Vivids, Electric Orange


Thursday, September 5, 2013

BLACK TAR

 Let me preface my long, and drawn out blog post by commenting on how I've blogged three days in a row with a 6-month or so hiatus prior, so I'm going to pat myself on the back.  On to the goods:


Yesterday after a job interview (which we will talk about later) I somehow wandered into a Sephora. I've been eyeing OCC's Lip Tar ever since the first time I heard about it...and then I just kept hearing about it.  $18 a pop though?? A GIRL CAN DREAM...and with about a billion colors to choose from online, I kept dreaming-- you don't wanna be stuck w/ a color that looks ungodly.  Thanks to my favorite beauty expert & photographer friend, Bailey Munson, I frantically messaged her to see if she'd tried the product and if so if she had suggestions!  Upon her suggestion, I purchased the color "Queen" and I'm definitely in love!


Oh...speaking of that whole interview business...the look I posted yesterday was what I was wearing.  This outfit I threw on today has been one of my other favorite go-to interview outfits.  Again, black and white have become my favorite colors of choice.  This trumpet/tulip (whatever they're calling it these days) is definitely great because I am totally seeing the look coming into this fall season--funny thing is I bought this very randomly at a Charlotte Russe store in Topeka, KS last winter on a really strange premonition and, hey, I couldn't lose at $2 on the sale rack!


Wednesday, September 4, 2013

ON THE HUNT


It's cool that unempoyment right out of college gives me some spare time to blog, but in all honestly I have been out there trying and trying over and over again and the real world is seriously... SUCH A BITCH.  I've been on A LOT of interviews these past couple of weeks though, which is promising; some more recently being second interviews and some being very specific to my interests even (cross your fingers on me being gainfully employed in the near future!).  Today I had an interview for a receptionist position at an upscale hair salon--this is what I wore!  


I think it works for this type of position because black is classic and in a trendy cut it's still very relavant.  I've been dragging along my briefcase-esk purse which holds my folder of resumes and references nicely.  I've been wearing my black Zara sandals almost every where as well because they just seem to add a nice little touch of uber-chicness to a look (and they are flats, which is sooo great).  I'll post more of the looks I've worn to interviews because I thought that even though a few of them went less stellar than I'd hoped, I sure looked the part each time.  I've been getting creative because I'm too lazy to figure out the laundry room in my complex still, so I've concocted quite a few new looks I didn't even know I could pull out of my exisitng wardrobe!

XX, 
Alex

Tuesday, September 3, 2013

DIY: EMBELLISHED KNEE


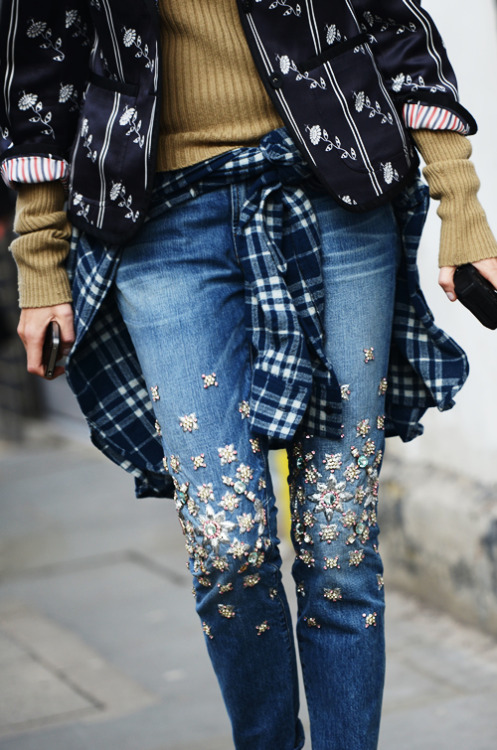
The day I walked into Hobby Lobby and realized all the beads were 50% -and that it would include that gigantic 1 lb. tub of acrylic gemstones I'd been eyeing previously- was one of the most beautiful days of my life.  That day was probably almost a year ago, and I've still got a ridiculous amount of gemstones left.  I've been trying to get creative on how to use them in a mildly excessive manner recently, and to what some may call fate (or too much time spent lurking the internet) I came across this lovely image of a pair of embellished jeans:


Putting two and two together I decided to spend a Sunday morning doing a little crafting which meant glueing all of my fingers together while trying to do a decent enough DIY to actually want to wear them in public.  Although I've no idea the bonding properties, blah-de-blah- of the glue I used, let's just say it was the really pungent kind (both smell and strength-wise).  I wore them out to lunch yesterday and fell asleep in them for the afternoon after lunch after too much pizza, and they held up completely fine--we'll have to see about a wash cycle later but I'm sure turning them inside-out will help a lot.

Ta-da! I feel like these jeans, like many, can be dressed up or down as long as your look is still pretty basic--for example white button down/white pumps-- but I'll stick to a baseball or oversized tee & converse any day of the week. I must admit I'd rather have had jeans that were a little baggier/boyfriend style but this was a pair I had that I didn't feel worried experimenting on and hey, Young Alex would be so proud of my Barbie jeans, and that's all I could ask for.


Friday, January 18, 2013

DIY: PUZZLED


The other day I came across a box of puzzles pieces that I had used for a stopmotion video project last fall, I then thought to myself: 1. I'm never going to actually do this puzzle again 2. I'm pretty sure more than a few pieces went missing anyway 3. What can I do to not feel bad about just tossing these?

DIY PUZZLE PIECE EARRINGS:  You know by now (if not, give a quick scroll through my blog) that I have a minor obsession with metallics, especially gold. Gold accessories to be exact.  Here's how I did it:


This project was a great excuse to finally buy the metallic spray paint I've always wanted. I'm in love with it and it truly does dry in less than 15 minutes like it states on the can.


Old, sad, and lonely puzzle pieces.  I opted to use different shaped ones. This puzzle is an ocean scene, how exciting!


Jump rings, Fish hook earrings (granted they are a lot more "brassy" than my gold spray paint but I had these already in my toolkit)

1. Go outside, ya fool, you're gonna be spray painting
2. From failed experience I suggest painting the backsides of the puzzle pieces first (the non-glossy side) since the paint will go on more even and doesn't matter as much anyway since it won't be seen much!
3. Once the backs are dry, flip over and coat the fronts of the pieces.  I had to do at least 3 coats to get it even- don't be afraid to really saturate them since the paint should dry pretty fast.
4. After completely dry (I waited about 3 hrs just to be safe), punch holes in the tops of each piece close enough the edge that a jump ring will work.  I used a small hammer and nail to do mine, but I'm sure there are more precise ways as well!
5. You'll want to use two jump rings to connect the puzzle piece to the fish hook earrings so that they face the front.
6. Put them on, feel fabulous, and enjoy the endless questions like "OMG, where did you get those!?"


XX ALEX

Wednesday, December 26, 2012

CATHOLIC SCHOOL GIRL


+ Vintage letter jacket: my old man's!
+Vintage Lacoste sweater: Rockstar & Rogers, Manhattan, KS
+Ralph Lauren pleated plaid wrap skirt: Goodwill bins, Portland, OR
+Gray Doc Martens (knock-offs): Walmart


Wednesday, December 19, 2012

WRAP IT UP

Last minute shopping? (isn't that a given?) Last minute gift wrapping? Here are a few ideas to use things you may have or easy things that will give your gifts a little more personal feel.


Although this could look a little more festive, I'm happy to share this little idea with you to give your Christmas gifts a little homemade feel.  I've had a few of these "Christmas tree air-fresheners" in my car that have long-since lost much of their scent & i thought what better way than to use them as gift tags!  I took a blank mailing label and cut it to size to cover the original labels.  I never get anything other than the Black Ice scent but using the evergreen/pine ones would be more festive and along w/ looking nice it'll smell nice, too!


 It's always almost impossible to disguise a wine bottle--they're usually just sitting in a gift basket or have a ribbon tied around their necks.  For this I took an old cable knit glove (you could also get new ones to include w/ the gift) and put the "middle finger"of the glove over the top of the bottle. I then tied together the thumb and pinky and then the ring and index to create a braided/rosette look.  To make it more festive I ran outside and snagged a few sprigs off our cedar trees and added them to the bunch. voila!


This one is the simplest, and maybe the cutest.  Instead of using boring stickers or tags to identity who the gift is for...use a picture of them!  To unify, I decided to make my images black and white.  This can be a great way to bring up family memories and events by including old family photos.  Be creative-- cross out and circle people in group photos, or be specific and cover up everyone but the person getting the gift with bows!