Showing posts with label DIY. Show all posts

Thursday, September 4, 2014

SIDE ANGLES R THE POSE


There's one thing a girl like me won't tell you she does....


Really though...we all that type of girl...

The one that uses Pinterest, ayyyyy


So today "I'm a pinterest post."


I did laundry and cooked a spaghetti squash last night, while i painted some cheap gold dollar store frames.  I epitomized what it meant to be a housewife and I loved all the minutes of it.  Tonight I'm making brownies for a work function and repotting my plant, in case you were wondering.


But I'd like to think of my craftiness as a little more intuitive than the reposted-upon-reposted "how-to hang your necklaces from a photo frame" type of creation.  I dangled a fake bug in a frame so i'm edgy enough, right?


I've yet to decide where to place these amongst the apartment.  They were very spur of the moment!  The bug will obviously be in the bathroom or kitchen though...how could I not.


((Also...i'm still having the most unfortunate time balancing whites via upload to blogspot.  If you have advice gimmeeee. I've attempted to turn saturation down many-a-time to no avail </3))


As if to call myself out further, here's a link to my "for the home" board on pinterest. I fessed up, what about u?

xo
am


Wednesday, August 6, 2014

#BATHROOM SELFIE

A few months ago I spent the day with my mother and grandmother shopping and antiquing.  The location: Middle-of-Nowhere Kansas (to name a few towns...possibly unincorporated ones-- Belleville, Scandia, Cuba.  These places were landmines for treasures of years past. And me?  A kid in a candy store.  But one of the most interesting spots we "hit up" was a place called the Feathered Nest. A skeptic, per usual, I questioned my mom's constant RAVING about it.  But for once in my life, she was right and I was wrong (lol luv u mom).  We spent damn near 2 hours there and I could have stayed longer.  The ladies who owned it were lovely and boy did they have a knack for interior design.  Upon my mom's raving, she said, "Alex, you have to check out the bathroom!!1!"  and in the span of our 2+ hour stay, I did.  I walked in, greeted by a large painting of a german shepherd (my weakness<3) and then the sink caught my attention. I know, a sink? catching attention?  It was a circular basin sink and inside the bowl they had placed large polished stones.

So. being a creep. I took pix in the bathroom.
And then as soon as I got back that weekend I went and bought some rocks.

So here's my sink `*1!!1~~!_@``~**


Not nearly as fancy of a basin sink as they had had, but mine is a simple pedestal type..so I don't think it looks too outta whack.


There are a few things, if you want to do this with your own sink to remember though:

1. You are going to have to (and I mean HAVE TO) clean your sink at leeeast once a week.  You don't want scummy rocks.  I'm a clean freak, especially since I started living solo, so it's nothing unordinary to me.

2.  MAKE SURE your rocks don't have jagged edges or are too rough that they'll damage your sink.  I rent a place and I'm not down to buy a new sink come the end of my lease.

3.  This may be something for you that's more practical in a guest room/bath type of situation.  They will be like "hey that's cool" and you will feel successful @ life and also won't have to clean it nearly as often


And lastly, a tip on cleaning sinks: use a tiny spray of pledge and a soft, dry rag to shine the stainless steel/faucet.  You'll be amazed by the reflection you see of yourself :P

XOXO


Wednesday, July 16, 2014

THE TRAVELER & HER BAG OF TRIX

WHEEERE HAVE I BEEN?

ASK ME!

?

mhmm....I've been on a lil vacation in...

NEW YORK CITYYY


So today's post is about traveling.  In this case, about me traveling and how I pack for a weeks' worth of adventure time!  Hopefully it can help you next time you realize you haven't packed and your flight leaves at 7am and it's already midnight the night before. *good luck*~~~

Packing is a nightmare. Over and under-- we always mess up one way or the other!  For me it's the dreaded "sans-toothbrush" or "alex forgot a jacket again"  but hey, live a little! and embrace your failures...(and if you forget a jacket it just means you *have* to buy a new one!)


I'm a basic ass girl (not to be confused with a basic bitch).  I like to dress in simple things, in simple colors so my bad side can shine through.  This works well for the traveler.  Tops in simple cuts and styles in blacks and greys can mix and match until you've worn them each 10 times and you realize you smell more than a bit funky as you board your plane home.


Not only are basic tops ideal...basic bottoms will make your life one of ease!  Opt for two shades of denim.  I always pack a pair of cotton/spandex/comfy shorts to sleep in...and I also wear them under dresses because I am a 10 year old.


You must remember, you are on vacation.  And you are away to have fun!  So pack a couple of fun and loud pieces.  I like to pack a floral day dress.  Fun leggings are great to pair with simple tops too, and won't take up much extra space in your bag


If you are going to attend brunch or a museum or idk, you wanna feel a little fancy try packing a skirt.  Maxis work well and look dressier.  I packed my skirt that I blogged about a while back and it worked great worn with a black spaghetti strap tank


The thing is...wherever you are traveling...you're going to want pizza.  You're always going to want pizza even if you aren't traveling tbh. A nice T-shirt that shows you are "hip" and aware of pop culture is great for a pizza outing.


One of the most important things to remember is what you'll be lugging around all day as you pretend to not be a tourist even though you are obviously a tourist.  Pack a monster purse so you can use it as your personal item on the plane.  Pack your little purse (to take out to dinners/thaaa club) inside your big purse while traveling!


Don't fuck this step up.  Your footwear game is very important.  To be honest,  New York ate my feet alive...but it wouldn't have mattered the shoe. If it's hot, if you're walking around lost forever...you're going to get a blister or more like 10.  I hate "tourist shoes" though so please suffer with me a little and leave your hiking sandals with your friends' new puppy that's in its chewing stage >.<


Accessories are things you mustn't forget either.  Cameras are good, and mini 110 film cameras are better.  A book for plane and train rides is ideal when your phone has died 30 minutes in to the trip.  And sunnies...never forget the sunnies!

And finally, a confession:

I packed five shades of lipstick

XOXO


Wednesday, June 18, 2014

WHITE WALLS ( and a little black )


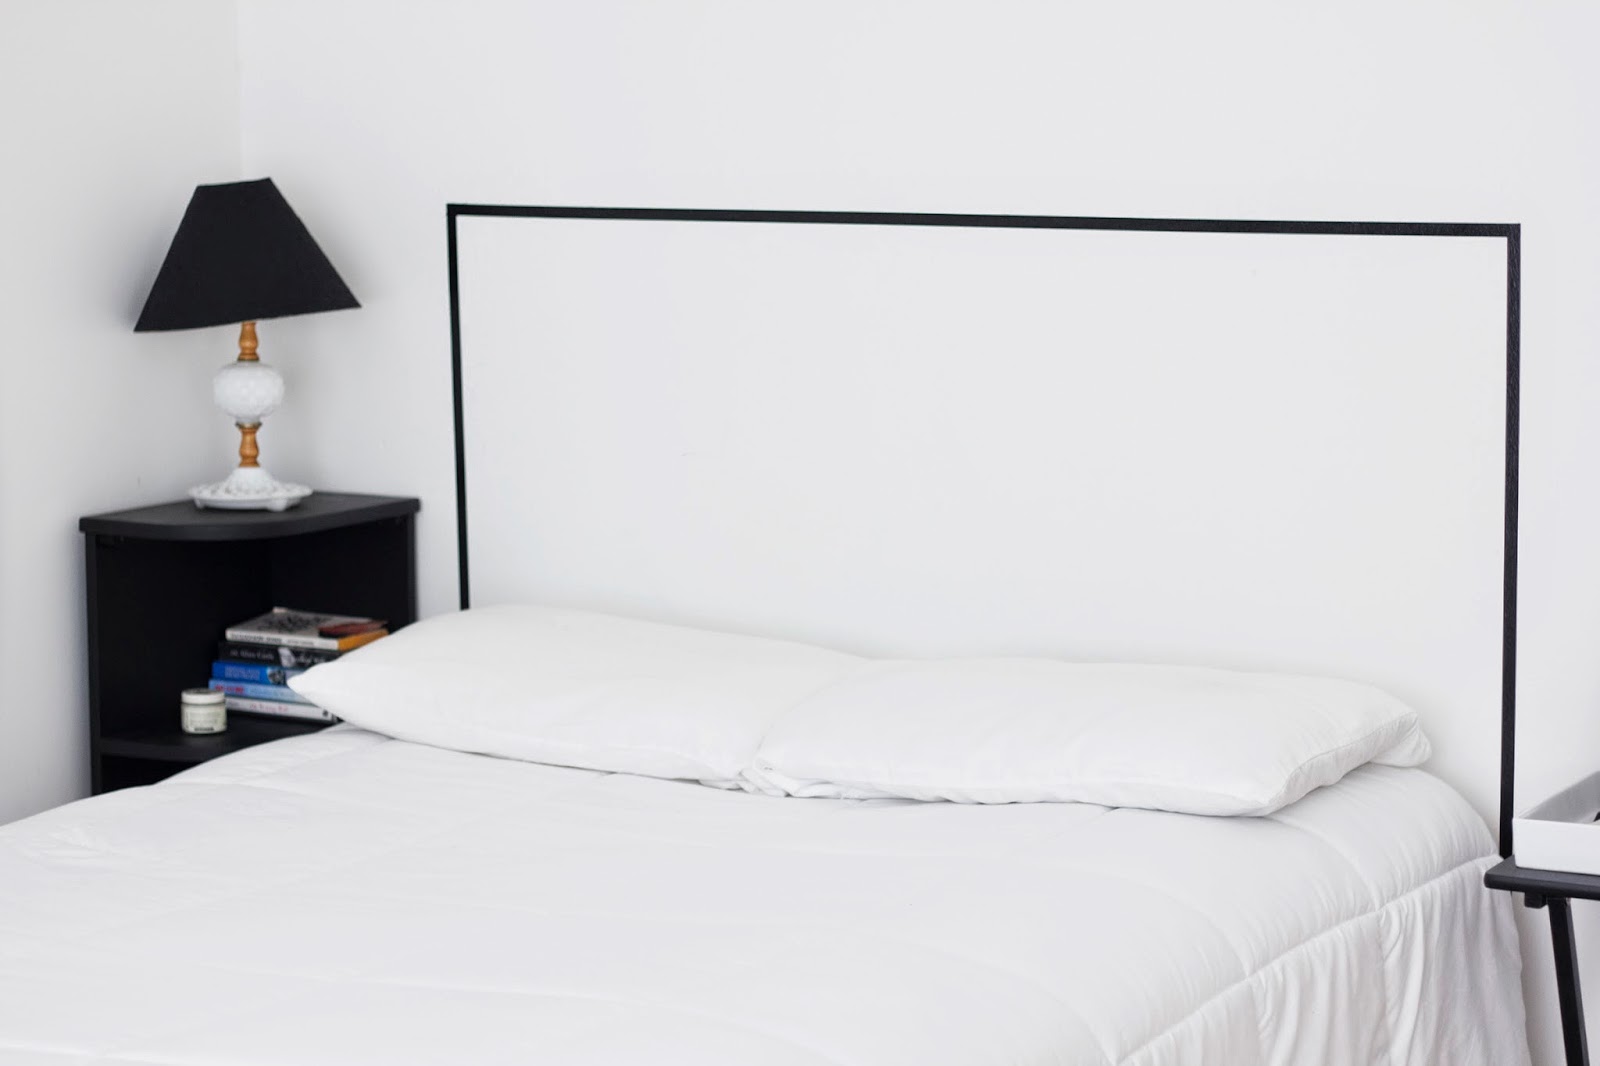
As blank as I love keeping my walls to use for plain backdrops in photos...I had to jazz mine up a little because it looked like no one actually lived in the apartment.


The jazz cost about $2.  Making it even more jazzy.


 Taking washi tape (a tape very similar to masking tape, but with less sticky residue and a more paper-like feel)  I created a faux headboard with three quick strips!  I measured up with a tape measure from each side of the bed and marked a few spots in the middle, kept the tape taught when applying, and magically got a much more straight line that I could have ever imagined.


I've had multiple people over, and all be very surprised to find out it wasn't a headboard...it has a very deceiving 3D effect apparently!


And the only other thing on my walls, you ask? 


Clear clipboards used sort of like you would a picture frame.  The "art"?  Cut out pieces from paper sacks I used as a drop cloth when painting my trunk.  I'm such a punk.


Welcome to my home! I hope you like it!

<3

Alex

p.s.-- I'm not sure why blogspot demands to make my photos look like a lumpy pile of grossness...they are originally much more crisp and white </3  if you are blogspotter and have any tips on exporting files or on the upload to blogspot, I'd much appreciate the aid


Wednesday, June 4, 2014

BEDSIDE: THE EASIEST DIY NIGHTSTAND

As I've posted a bit about it before,  I've recently moved into my own studio apartment.  It's my first time living alone...(with my pet rat, of course) and it's been really lovely!  It's amazing what a mess I can create within minutes of sifting through my closet!  And the kitchen?!  I'm incredible at dirtying ALL of my dishes in one quick session.  But knowing you're the sole creator of the mess....makes you a bit of a clean freak, so thankfully if you come on a good day, it's pretty tidy.

Since this is my first time living sans-roommates, I had a weird amalgamation of items in my possession...and did not have a single pot or pan...man, was I a shitty roommate?  Nonetheless, I've been trying to slowwwlyy add to my collection of crap, in a thoughtful and more minimal manner this time around.

So when I realized I had no furniture and that I was going to still be picky about it...I lived in a very empty apartment for the first month.  Only now is it looking a bit more liveable.  My newest acquisition(s) are what I'm going to show you today!

One thing that is nice to have are side tables.  One thing that is expensive when you go looking for them is...side tables.  I'm not loaded here, and hey, I already had to splurge on some pots and pans recently!


THE SOLUTION:


A T.V. TRAY + A TRAY


FOR WHAT? $8-10 for a tv tray? SOLD


IT WAS SO EASY. I don't even need to explain.


The tray is nice to add because all your little odds and ends (DEAR LAWD the amount of bobby pins lurking in my apartment) are contained.  I was so lucky to stumble upon this tray too...it's heavy and ceramic and was on sale <3___<3


The maybe even greater thing about doing this is that you can use the tray for BREAKFAST IN BED


And you can not feel like a piece of scum for eating in bed, but instead, feel really cool...cuz yr cool


So...with that...who wants to come make me breakfast?  I'll be in bed.


<3
Alex

Thursday, May 8, 2014

BEFORE & AFTER: BLK ON BLK

Today's post is the first real post introducing you into the decorating of my new apartment!  
It is a bit of a DIY post...
 

Until about three years ago, this trunk had been out in the same outbuilding on my family's property...storing old knick-knacks of my dad's from his "younger days."  When I was finally released into the world as a sophomore in college, out of the dorm life and in a REAL HOUSE, I needed some furniture...some places to keep my ridiculous amount of clothes, if we're being honest here.

So upon a questionable level of trust in me not "ruining things",  my dad let me drag it around with me.  It made it all the way to Chicago this past year.  It's not too big for a trunk and I love that!  And you know what's also super rad about a trunk?  YOU CAN ALSO USE IT LIKE A TABLE i.e. PUT MORE OF YOUR CRAP ON TOP OF IT!


So this is what I was dragging around.  I will say my favorite color has been yellow for a while now until gray took it's place (because apparently I'm into sad things now).  A little rough on the edges and with the weirdest color scheme including brown, I once again cautiously asked my dad if I could paint it.  Now three years after my initial request, he must just be used to my crazy ideas, and hey, he didn't even hate the idea of painting it at all.


^^^SO THIS IS WHAT I DID ^^^


The trunk is a weird combination of metal and wood elements.  I sanded the roughest of parts with a medium-fine grit sandpaper.  Then painted the whole trunk a matte black and added a glossy layer to the details- like the hinges and handles.


Overall, I'm more than happy with the result!  For my boring desire for an all black & white apartment I am closer to my goals, and I think this piece is interesting with the different paint textures...black isn't too boring!  I will be using this more like a coffee table (and of course, all while storing my bulky sweaters inside!)


<3 Best,
Alex

Thursday, April 10, 2014

BLACK MAGIC

I've always done weird things, and those weird things generally make it full circle...making my appearance  ~ "a little weird" ~


MY FAVORITE.


So the other day when I was being weird (looking for an eye patch....just, ya know, because i might want it for photos or something) I came across a cute lil...


S   N   A   K   E


A black and white striped rubber snake...nice and fake. I didn't know what I would do with it, but I knew...like an eye patch I would need it for something.


DEAR LORD, I'M A MESS.


But I found something to do with it----


wEiRd?

I
LIKE
IT


DO U LYK IT?


& because it's rubbery it's pretty comfortable

 .... for having a huge thing on your neck.

I honestly can't wait to wear this IRL

U SHOULD TRY IT 2


Friday, January 17, 2014

GETTIN' HANDSY (A DIY)

It's been a good while but I come to you today with something special....

A DIY


*claps* *hoots* *hollers*


A long long time ago (maybe a few months) I came across the most beautiful and simple and perfect hand accessory.  Sterling-silver plated and topping $250, I knew I would have to keep dreaming...but I also knew that I could probably make something quite similar.


HELLO, CAN YOU SAY, "BEAUTIFUL"?


So, of course, it took me that long long time to get to making my own version but at least I actually did!


Although I'm a city girl at the moment, I'm a country girl through and through (surprising to some, I know!)  My dad operates our small family farm and I grew up following him around everywhere...being his "go-fer" going to get him different tools around his shop while he worked on things.  (I loved this job and it took me a stupid amount of time before deciphering the fact he was not just calling me a cute little gopher :)  One thing my dad always had in the back of his pick-up truck, the front on his truck, in the shop, in the house---EVERYWHERE-- was something called baling wire.  I've referred to this type of wire around some people and in return received odd looks and suddenly reminded that, oh man, I am a farm girl.  Baling wire is something my dad always used around the farm to fix fence---to fix anything really--and is also used for electrical fencing in rotational grazing.  It's a very thick gage wire that my little tomboy hands could barely twist..and still have trouble bending today.  I knew this great little material would be perfect for replicating my dream accessory and lucky for me my dad packed me a small bundle of this magic wire in my toolkit...probably for more practical uses than this.

**for anyone looking to purchase baling wire I would look for something similar to this: 14G Galvanized Steel Wire (I think this is about the right thickness).  I don't imagine craft stores sell anything this thick so search for it at places like home improvement or farm supply stores.  It is sometimes called soft wire or you could ask for electrical fencing wire**


----ON TO THE HOW-TO ISH---

Materials:
- Baling wire (alot 1-1.5 ft of 14g wire)
- Needle-nose pliers
- Wire cutters (many needle-nose pliers will cut through wire, but baling wire is thick so it may be a little struggle)
- A hand (yours) (mine if you are making me a gift)
- Steel wool
- Jewelry File

1. Find the middle of your strip of wire and give it a slight bend into a "U," a little bigger than your middle finger.  This will be the part that will slide underneath your middle finger.
2. Take 1/2" of so of the tip of the "U" shape in your pliers and bend it so that it will lay more comfortably under your finger and across the back of your hand.
3.  Continue to try on the brace, do not move onto the next part of the bracelet until it feels even and right.
4. Run the two sides of your wire towards your wrist until you get near the wrist bone.  Straighten out your wire one last time then begin to form a bend outward on both sides to create the "bracelet" part of the hand brace.
5.  Form form form until your wires meet (or excess overlaps) in the middle of the inside wrist.
6. Cut off excess (maybe you should be wearing safety googles...idk)
7.  Run over the whole piece with steel wool, being careful to not change the shape you've worked so hard on!
8.  File the ends of the wire and finish with steel wool
9. GASP IN AWE
10. TRY THAT BAD BOY ON
11. WEAR IT EVERYWHERE
12. GRACIOUSLY ACCEPT THE SEA OF COMPLIMENTS W/ BIG SMILES


My next post will feature a tutorial on this hair-do (and a less messy version).
Until we meet again, xx


Tuesday, September 3, 2013

DIY: EMBELLISHED KNEE


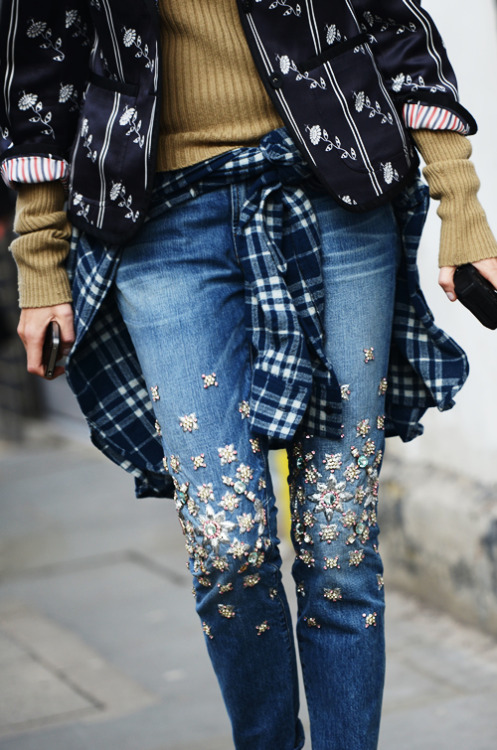
The day I walked into Hobby Lobby and realized all the beads were 50% -and that it would include that gigantic 1 lb. tub of acrylic gemstones I'd been eyeing previously- was one of the most beautiful days of my life.  That day was probably almost a year ago, and I've still got a ridiculous amount of gemstones left.  I've been trying to get creative on how to use them in a mildly excessive manner recently, and to what some may call fate (or too much time spent lurking the internet) I came across this lovely image of a pair of embellished jeans:


Putting two and two together I decided to spend a Sunday morning doing a little crafting which meant glueing all of my fingers together while trying to do a decent enough DIY to actually want to wear them in public.  Although I've no idea the bonding properties, blah-de-blah- of the glue I used, let's just say it was the really pungent kind (both smell and strength-wise).  I wore them out to lunch yesterday and fell asleep in them for the afternoon after lunch after too much pizza, and they held up completely fine--we'll have to see about a wash cycle later but I'm sure turning them inside-out will help a lot.

Ta-da! I feel like these jeans, like many, can be dressed up or down as long as your look is still pretty basic--for example white button down/white pumps-- but I'll stick to a baseball or oversized tee & converse any day of the week. I must admit I'd rather have had jeans that were a little baggier/boyfriend style but this was a pair I had that I didn't feel worried experimenting on and hey, Young Alex would be so proud of my Barbie jeans, and that's all I could ask for.